Tutorial 1 - Proximity Alert System (LCD + Ultrasonic + Optional Buzzer)
Build an advanced object detection system using an ultrasonic sensor and display warnings on an LCD. Perfect for learning how input and output modules interact. Optional: Add a buzzer for audio alerts.
Circuit Diagram
💡Tip: Wrap logic in functions (e.g., checkDistance()), so your code stays clean and easy to reuse.
What You'll Need
- Arduino Uno x 1
- HC-SR04 Ultrasonic Sensor x 1
- 16x2 LCD Display (HD44780 & PCF8574-compatible) x 1
- Buzzer (Optional) x 1
- Jumper wires x 12
- Breadboard x 1
- Arduino Uno USB Cable A to B x 1
- Arduino IDE installed
Instructions
- Insert the ultrasonic sensor into the breadboard. Connect VCC to 5V, GND to GND, Trig to pin 9, and Echo to pin 10.
- Connect the LCD using the I2C pins: VCC to 5V, GND to GND, SDA to SDA, and SCL to SCL (use the dedicated I2C pins).
- Optionally, place the buzzer on the breadboard. Wire positive to pin 8 and negative to the GND rail.
- Plug your Arduino into your computer using the USB cable.
- Open the Arduino IDE, and paste in the code below.
- Under Tools, select your board type and COM port.
- Click Upload. Move an object near the sensor and watch the LCD and buzzer react in real-time!
The Code
#include  <LiquidCrystal_I2C.h> // Include the library for I2C-based LCDs (used to control the display easily)

// --- Pin Definitions ---
const int trig_Pin = 9;         // Ultrasonic sensor's Trig pin connected to digital pin 9
const int echo_Pin = 10;        // Ultrasonic sensor's Echo pin connected to digital pin 10
const int buzzer_Pin = 7;       // Buzzer pin connected to digital pin 7
const int thresholdDistance = 100; // Set the threshold for object detection to 100 cm

// --- Distance Variables ---
long duration;                  // Variable to store how long the echo was received
int distance;                   // Calculated distance based on the duration
bool objectDetected = false;    // Boolean flag to check if an object is within range

// --- LCD Setup ---
LiquidCrystal_I2C lcd(0x27, 16, 2); // Create LCD object with I2C address 0x27, 16 columns and 2 rows
unsigned long prevDisplayTime = 0; // Used to keep track of last time LCD was updated
unsigned long displayInterval = 1000; // Update the LCD every 1000 milliseconds (1 second)
int dots = 1; // For animated dots on the LCD during scanning

void setup() {
  pinMode(trig_Pin, OUTPUT);     // Set the Trig pin as an OUTPUT
  pinMode(echo_Pin, INPUT);      // Set the Echo pin as an INPUT
  pinMode(buzzer_Pin, OUTPUT);   // Set the buzzer pin as an OUTPUT

  lcd.init();                    // Initialize the LCD
  lcd.backlight();               // Turn on the LCD backlight

  Serial.begin(9600);            // Start the Serial Monitor for debugging (optional)
  lcd.setCursor(0, 0);           // Set LCD cursor to the first row, first column
  lcd.print("System Ready");     // Display a startup message
  delay(1000);                   // Wait 1 second so the user can see the message
  lcd.clear();                   // Clear the LCD after the delay
}

void loop() {
  digitalWrite(trig_Pin, LOW);       // Clear the Trig pin
  delayMicroseconds(2);              // Wait 2 microseconds
  digitalWrite(trig_Pin, HIGH);      // Send a HIGH pulse for 10 microseconds to trigger the sensor
  delayMicroseconds(10);
  digitalWrite(trig_Pin, LOW);       // Stop the pulse

  duration = pulseIn(echo_Pin, HIGH);         // Read how long the Echo pin stays HIGH
  distance = duration * 0.0343 / 2;           // Convert time to distance (cm)
  objectDetected = (distance > 0 && distance < thresholdDistance); // Check if object is within threshold

  if (objectDetected) {
    lcd.clear();                          // Clear the screen
    lcd.setCursor(0, 0);                  // First row
    lcd.print("Object Detected!");       // Warning message
    lcd.setCursor(0, 1);                  // Second row
    lcd.print("Dist: ");                 // Label for distance
    lcd.print(distance);                 // Show distance
    lcd.print("cm");                     // Unit
    digitalWrite(buzzer_Pin, HIGH);     // Turn the buzzer ON
  } else {
    digitalWrite(buzzer_Pin, LOW);       // Turn the buzzer OFF

    if (millis() - prevDisplayTime >= displayInterval) { // Only update LCD once every interval
      prevDisplayTime = millis();        // Reset the timer
      lcd.clear();                       // Clear LCD
      lcd.setCursor(0, 0);               // First row
      lcd.print("Scanning area");        // Scanning text

      for (int i = 0; i < dots; ++i) {   // Add animated dots
        lcd.print(".");
      }

      lcd.setCursor(0, 1);               // Second row
      lcd.print("Dist: ");               // Show distance
      lcd.print(distance);
      lcd.print("cm");

      dots++;                            // Increase number of dots for animation
      if (dots > 3) dots = 1;            // Loop back to 1 after 3 dots
    }
  }
  delay(100); // Wait 100ms before next sensor reading to avoid screen flickering
}
Schematic Diagram
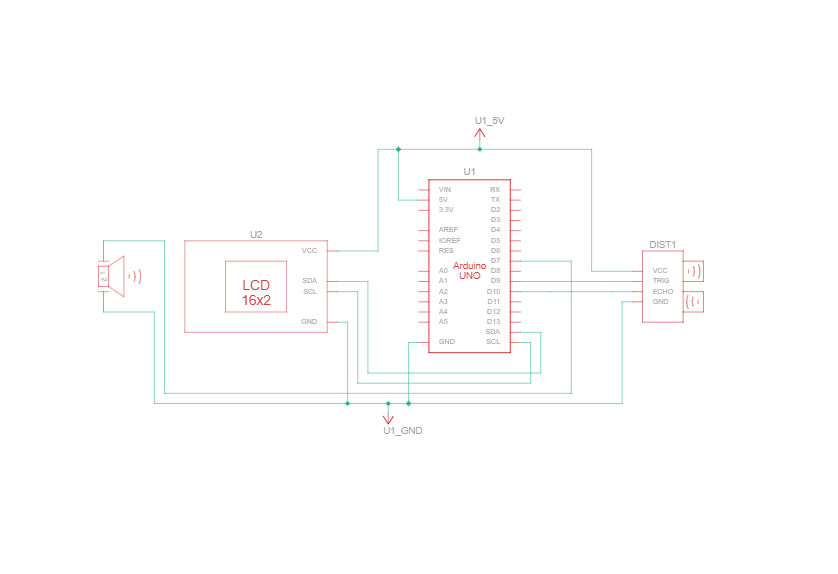
Schematic diagrams show how current flows and how components connect logically, not just physically.
Tweak This Project
- Lower the distance threshold, change
thresholdDistanceto something like30for closer detection.