Tutorial 3 - Ultrasonic Distance Sensor
Use the HC-SR04 ultrasonic sensor to detect the distance of an object moving closer or farther away. This tutorial introduces sensor-based input and real-world object interaction.
Circuit Diagram
💡Tip: Objects need to reflect sound waves clearly, keep objects flat and centered for the most accurate distance readings.
What You'll Need
- Arduino Uno x 1
- HC-SR04 Ultrasonic Sensor x 1
- Jumper wires x 4
- Arduino Uno USB Cable A to B x 1
- Arduino IDE installed
Instructions
- Connect VCC on the sensor to 5V on the Arduino.
- Connect GND on the sensor to GND on the Arduino.
- Connect Trig and Echo to any digital pins, this example uses pins 9 and 10.
- Plug your Arduino into your computer using the USB cable.
- Upload the code below using the Arduino IDE.
- Open the Serial Monitor (top-right corner of IDE) and set it to 9600 baud.
- Move your hand toward and away from the sensor to see distance readings update live!
The Code
// Define the pins connected to the ultrasonic sensor
const int trigPin = 9;  // Pin used to send a signal
const int echoPin = 10; // Pin used to receive the signal

void setup() {
  Serial.begin(9600); // Start the Serial Monitor for viewing results

  pinMode(trigPin, OUTPUT); // Set the trig pin as an output
  pinMode(echoPin, INPUT);  // Set the echo pin as an input
}

void loop() {
  // Clear the trig pin to start fresh
  digitalWrite(trigPin, LOW);
  delayMicroseconds(2);

  // Send a 10 microsecond pulse to trigger the sensor
  digitalWrite(trigPin, HIGH);
  delayMicroseconds(10);
  digitalWrite(trigPin, LOW);

  // Read how long the echo pin stays HIGH (in microseconds)
  long duration = pulseIn(echoPin, HIGH);

  // Convert time into distance in centimeters
  float distance = duration * 0.034 / 2;

  // Print the distance to the Serial Monitor
  Serial.print("Distance: ");
  Serial.print(distance);
  Serial.println(" cm");

  // Wait half a second before the next reading
  delay(500);
}
Schematic Diagram
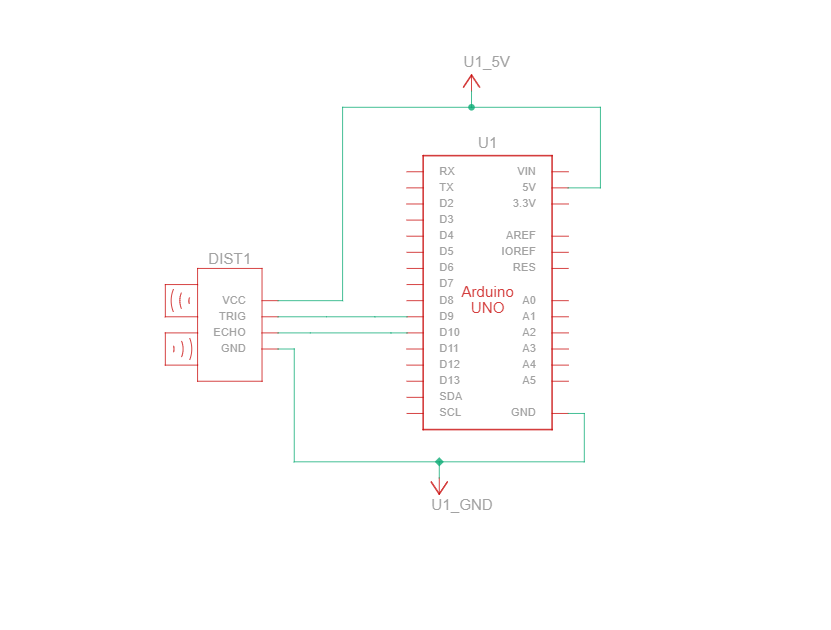
Schematic diagrams show how current flows and how components connect logically, not just physically.