Tutorial 2 - Serial Admin Tool
Control your Arduino in real time using the Serial Monitor. Instantly update values like LED brightness or servo speed without touching the code again, ideal for fast testing and live tweaking.
Circuit Diagram
💡Tip: Perfect for fine-tuning settings like LED behavior, servo speed, or mode switching, no re-uploading required. Just enter your new value straight into the Serial Monitor.
What You'll Need
- Arduino Uno x 1
- Arduino Uno USB Cable A to B x 1
- Serial Monitor (comes built into the IDE)
- Arduino IDE installed
Instructions
- Plug your Arduino into your computer using the USB cable.
- Open the Arduino IDE and paste in the code below.
- Under Tools, select your board type and COM port.
- Click Upload to flash your board.
- Open the Serial Monitor (top right icon or Ctrl + Shift + M).
- Type any number and press Enter, this updates the threshold in real time!
The Code
#include <Servo.h>  // Include the Servo library

Servo myServo;  // Create a Servo object

// === Pin Configuration ===
const int ledPin = 13;    // PWM-capable pin for the LED
const int servoPin = 11;  // Pin for controlling the servo motor

// === System Variables ===
String command = "";        // Stores incoming command from Serial
int delayTime = 500;        // Delay between LED blinks (in milliseconds)
int brightness = 255;       // LED brightness (range: 0-255)
int currentMode = 1;        // 1 = LED Blink, 2 = Servo Sweep, 3 = Manual
bool ledBlink = false;      // Tracks whether LED blink mode is active
int servoSpeed = 15;        // Delay between each servo step (lower = faster)

void setup() {
  Serial.begin(9600);           // Start Serial communication
  pinMode(ledPin, OUTPUT);      // Set LED pin as output
  myServo.attach(servoPin);     // Attach the servo to the defined pin

  // Display available commands
  Serial.println("Serial Admin Tool Ready.");
  Serial.println("Available Commands:");
  Serial.println("  led on / led off / led blink");
  Serial.println("  bright [0-255]");
  Serial.println("  delay [milliseconds]");
  Serial.println("  servo [angle]");
  Serial.println("  servo speed [servo sweep speed]");
  Serial.println("  mode 1  - LED Blink Mode [requires 'led blink']");
  Serial.println("  mode 2  - Servo Sweep Mode");
  Serial.println("  mode 3  - Manual Control Mode");
}

void loop() {
  // === Check for Serial Input ===
  if (Serial.available()) {
    command = Serial.readStringUntil('\n');  // Read input line
    command.trim();                          // Remove whitespace

    // --- LED Commands ---
    if (command == "led on") {
      ledBlink = false;
      analogWrite(ledPin, brightness);       // Turn LED on
    }
    else if (command == "led off") {
      ledBlink = false;
      analogWrite(ledPin, 0);                // Turn LED off
    }
    else if (command == "led blink") {
      ledBlink = true;                       // Enable blinking
    }

    // --- Brightness Control ---
    else if (command.startsWith("bright")) {
      brightness = command.substring(7).toInt();  // Get brightness
    }

    // --- LED Delay Control ---
    else if (command.startsWith("delay")) {
      delayTime = command.substring(6).toInt();   // Get blink delay
    }

    // --- Manual Servo Control ---
    else if (command.startsWith("servo ") && !command.startsWith("servo speed")) {
      int angle = command.substring(6).toInt();   // Get angle
      myServo.write(angle);
    }

    // --- Servo Sweep Speed ---
    else if (command.startsWith("servo speed")) {
      servoSpeed = command.substring(11).toInt();  // Get speed (in ms)
    }

    // --- Mode Control ---
    else if (command.startsWith("mode")) {
      currentMode = command.substring(5).toInt(); // Get mode number
      Serial.print("Switched to Mode ");
      Serial.println(currentMode);
    }

    Serial.println("Command received.");
  }

  // === Mode 1: LED Blink ===
  if (currentMode == 1 && ledBlink) {
    analogWrite(ledPin, brightness);
    delay(delayTime);
    analogWrite(ledPin, 0);
    delay(delayTime);
  }

  // === Mode 2: Servo Sweep ===
  else if (currentMode == 2) {
    for (int pos = 0; pos <= 180; pos += 5) {
      myServo.write(pos);
      delay(servoSpeed);
    }
    for (int pos = 180; pos >= 0; pos -= 5) {
      myServo.write(pos);
      delay(servoSpeed);
    }
  }

  // === Mode 3: Manual Mode ===
  // Controlled via Serial only (no loop logic)
}
Schematic Diagram
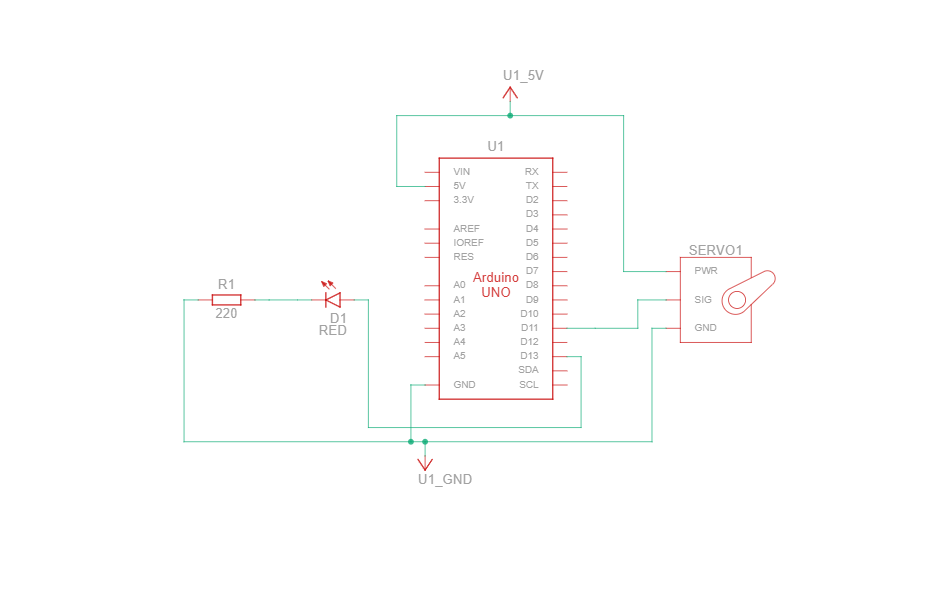
Schematic diagrams show how current flows and how components connect logically, not just physically.